First Example of Spring MVC using Spring Boot
Spring team has given us web interface to quick start our project. http://start.spring.io/
With help of this interface all dependencies will automatically added in pom.xml
Once we place that pom.xml in our project it downloads and will be placed in classpath.
Bootstrapping web application with Spring Initializr
Creating a Web application with Spring Initializr is a simple and very easy. We will use Spring Web MVC as our web framework.
Spring Initializr http://start.spring.io/ is great tool to bootstrap [initialize] your Spring Boot projects.
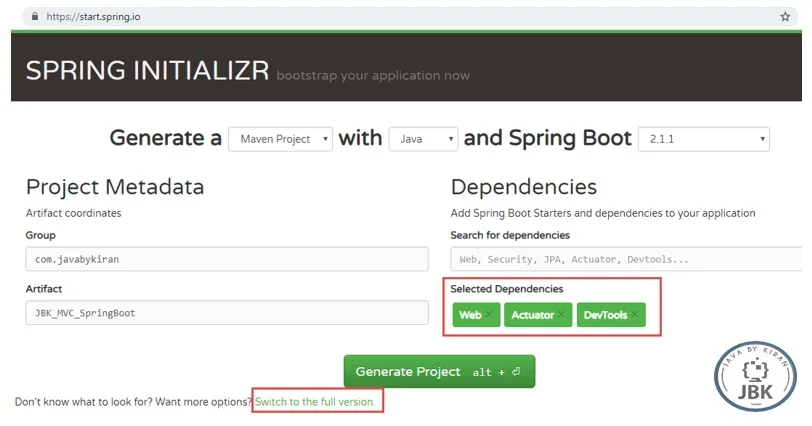
As shown in the image above, following steps have to be done:
Launch Spring Initializr and choose the following
Choose com.javabykiran as Group [ java package name]
Choose JBK_MVC_SpringBoot as Artifact [project name]
Choose following dependencies
Web
Actuator
DevTools
Click Generate Project.
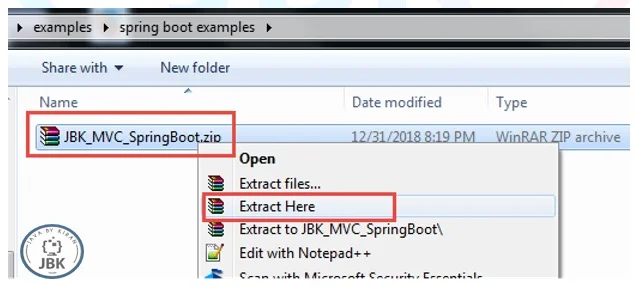
Zip will be downloaded extract Zip and import project as shown below:
Eclipse Configuration Steps
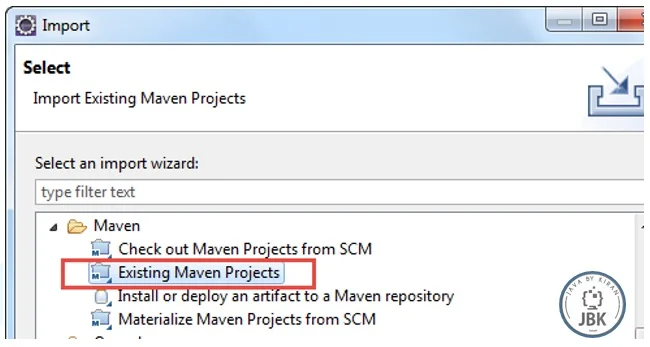
Once extracted zip file, open eclipse and use import option.
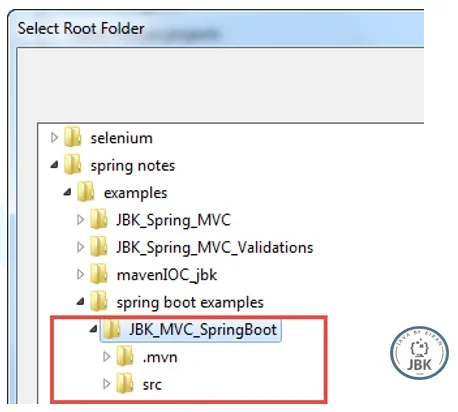
Next -> Select Root folder as below:
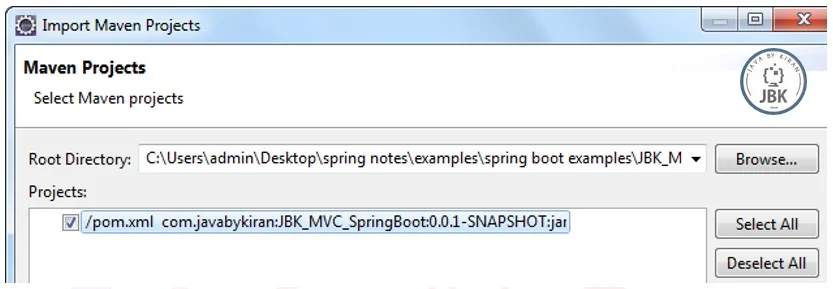
Click on Finish.
Wait until all dependencies downloaded and check if complete project visible in navigator.
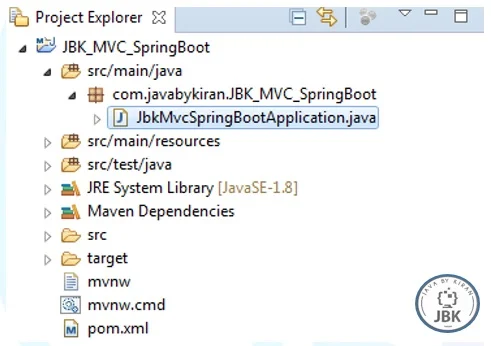
Project Dependencies
Spring Boot Starter Web provides all the dependencies and the auto configuration need to develop web applications. It is the first dependency we would use. No need to add below this is already added in pom.xml.
<dependency>
    <groupId>org.springframework.boot</groupId>
    <artifactId>spring-boot-starter-web</artifactId>
</dependency>
We want to use JSP as the view. Default embedded servlet container for Spring Boot Starter Web is tomcat. To enable support for JSP’s, we would need to add a dependency on tomcat-embed-jasper.
Add below in pom.xml
<dependency>
    <groupId>org.apache.tomcat.embed</groupId>
    <artifactId>tomcat-embed-jasper</artifactId>
    <scope>provided</scope>
</dependency>
Spring Boot Starter Web Dependencies
Following screenshot shows the different dependencies that are added in to our application because of Spring Boot Starter Web.
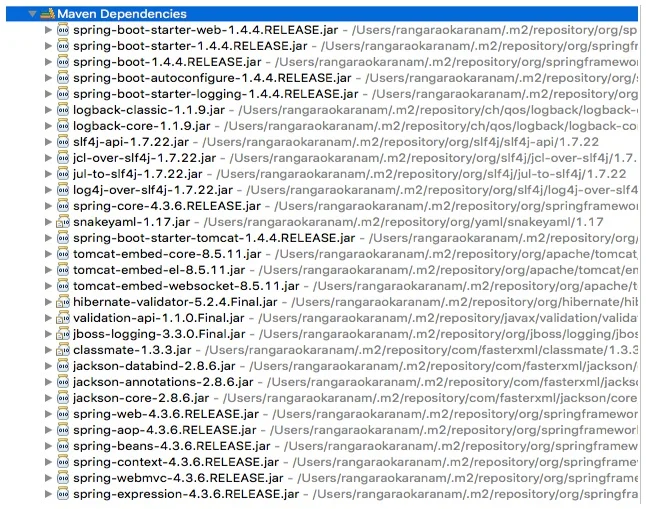
Dependencies can be classified into:
Spring - core, beans, context, aop
Web MVC - (Spring MVC)
Jackson - for JSON Binding
Validation - Hibernate Validator, Validation API
Embedded Servlet Container - Tomcat
Logging - logback, slf4j
Any typical web application would use all these dependencies. Spring Boot Starter Web comes prepackaged with these. As a developer, I would not need to worry about either these dependencies or their compatible versions.
Run main class JbkMvcSpringBootApplication.java. This is very important class in spring boot application.
After running this class observe log on console. Read highlighted text once.
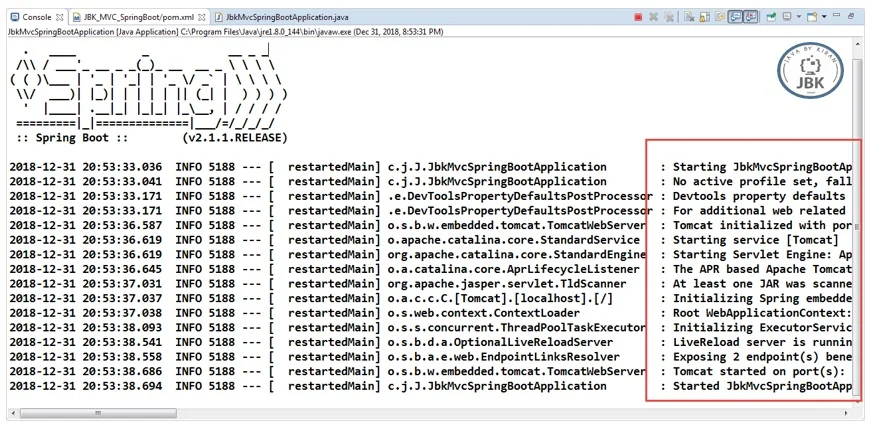
In summary below has happened, Spring Boot Starter Web auto-configures:
Dispatcher Servlet
Error Page
Web Jars to manage your static dependencies
Embedded Servlet Container - Tomcat is the default
Configuring a View Resolver
We would have our jsp’s in /WEB-INF/jsp/. We would need to configure the view resolver with the prefix and suffix.
Open application.properties and add below lines there.
spring.mvc.view.prefix=/WEB-INF/jsp/

spring.mvc.view.suffix=.jsp
This file is very important all configuration level data can be placed here let’s say I want to run my server on port no 8090 add below line there:
server.port=8090
Login Controller
public String showLoginPage(ModelMap model): Mapped to the \login Get Method, this method shows the login page.
@Autowired LoginService service: LoginService has the validation logic.
showWelcomePage(ModelMap model, @RequestParam String name, @RequestParam String password): Mapped to the \login Post Method, this method validates the userid and password. Redirects to welcome page if login is successful.
LoginController.java
package com.javabykiran;
import org.springframework.beans.factory.annotation.Autowired;
import org.springframework.stereotype.Controller;
import org.springframework.ui.ModelMap;
import org.springframework.web.bind.annotation.RequestMapping;
import org.springframework.web.bind.annotation.RequestMethod;
import org.springframework.web.bind.annotation.RequestParam;
import org.springframework.web.bind.annotation.SessionAttributes;

@Controller
@SessionAttributes("name")
public class LoginController {
    @Autowired
    LoginService service;

    @RequestMapping(value = "/login", method = RequestMethod.GET)
    public String showLoginPage() {
	return "login";
    }

    @RequestMapping(value = "/login", method = RequestMethod.POST)
    public String showWelcomePage(ModelMap model,
    @RequestParam String name, @RequestParam String password) {
	boolean isValidUser = service.validateUser(name, password);
	if (!isValidUser) {
            model.put("errorMessage", "Invalid Credentials");
            return "login";
	}
	model.put("name", name);
	model.put("password", password);
	return "welcome";
    }
}
What is ModelMap,Map and ModevAndView? – We have covered this in Interview Questions Section.
LoginService.java having business logic
package com.javabykiran;
import org.springframework.stereotype.Service;
@Service
public class LoginService {
    public boolean validateUser(String userid, String password) {
	return userid.equalsIgnoreCase("jbk")
	&& password.equalsIgnoreCase("jbk");
    }
}
Login View – JSP
JSP should be created in java\main\webapp\WEB-INF\jsp folder.
Simple login page with userid and password form fields. If error message is populated into model, ${errorMessage} will show the authentication failure error message.
login.jsp
<html>
<head>
<title>First Web Application</title>
</head>
<body>
    <font color="red">${errorMessage}</font>
    <form method="post">
        Name : <input type="text" name="name" />
        Password : <input type="password" name="password" />
        <input type="submit" />
    </form>
</body>
</html>
Welcome View - JSP
Welcome page is shown on successful authentication. Shows the name of the login user and a link to manage to-do.
welcome.jsp
<html<
<head<
    <title<First JBK Spring Boot Web Application</title<
</head<
<body<
    Welcome ${name}!! <a href="/list-todos"<Click here</a< to manage your todo's.
</body<
</html<
Todo Model and Business Service
package com.javabykiran;
import java.util.Date;
public class Todo {
    public Todo(int id, String user,
    String desc, Date targetDate, boolean isDone) {
        super();
	this.id = id;
	this.user = user;
	this.desc = desc;
	this.targetDate = targetDate;
	this.isDone = isDone;
    }
    private int id;
    private String user;
    private String desc;
    private Date targetDate;
    private boolean isDone;
    public int getId() {
	return id;
    }
    public void setId(int id) {
	this.id = id;
    }
    public String getUser() {
	return user;
    }
    public void setUser(String user) {
	this.user = user;
    }
    public String getDesc() {
	return desc;
    }
    public void setDesc(String desc) {
	this.desc = desc;
    }
    public Date getTargetDate() {
	return targetDate;
    }
    public void setTargetDate(Date targetDate) {
	this.targetDate = targetDate;
    }
    public boolean isDone() {
	return isDone;
    }
    public void setDone(boolean isDone) {
        this.isDone = isDone;
    }
    //Getters, Setters, Constructors, toString, equals and hash code
}
TO DO Service:
TodoService.java
package com.javabykiran;
import java.util.ArrayList;
import java.util.Date;
import java.util.List;
import org.springframework.stereotype.Service;
@Service
public class TodoService {
    private static List<Todo> todos = new ArrayList<Todo>();
    private static int todoCount = 3;
    static {
	todos.add(new Todo(1, "jbk", "Learn Spring MVC", new Date(), false));
        todos.add(new Todo(2, "jbk", "Learn Struts", new Date(), false));
	todos.add(new Todo(3, "jbk", "Learn Hibernate", new Date(), false));
    }
    public List<Todo> retrieveTodos(String user) {
	List<Todo> filteredTodos = new ArrayList<Todo>();
	for (Todo todo : todos) {
            if (todo.getUser().equals(user)) {
            filteredTodos.add(todo);
	}
    }
    return filteredTodos;
    }
}
List Todo JSP
List todos pages shows the list of todo’s. This is completely unformatted page. During the subsequest steps of our course, we beautify this page and add more functionality to add, delete and update todo’s.
<html>
<head>
<title> JBK  First Web Application</title>
</head>
<body>
    Here are the list of your todos:
    ${todos}
    <BR/>
    Your Name is : ${name}
</body>
</html>
To-do Controller
To-do Controller has a simple method to retrieve the list of to-do’s and populate it into model. It redirects to list-to-do’s view.
TodoController.java
package com.javabykiran;
import org.springframework.beans.factory.annotation.Autowired;
import org.springframework.stereotype.Controller;
import org.springframework.ui.ModelMap;
import org.springframework.web.bind.annotation.RequestMapping;
import org.springframework.web.bind.annotation.RequestMethod;
import org.springframework.web.bind.annotation.SessionAttributes;

@Controller
@SessionAttributes("name")
public class TodoController {
    @Autowired
    TodoService service;
    @RequestMapping(value = "/list-todos", method = RequestMethod.GET)
    public String showTodos(ModelMap model) {
	String name = (String) model.get("name");
	model.put("todos", service.retrieveTodos(name));
	return "list-todos";
    }
}
Eclipse Project Structure
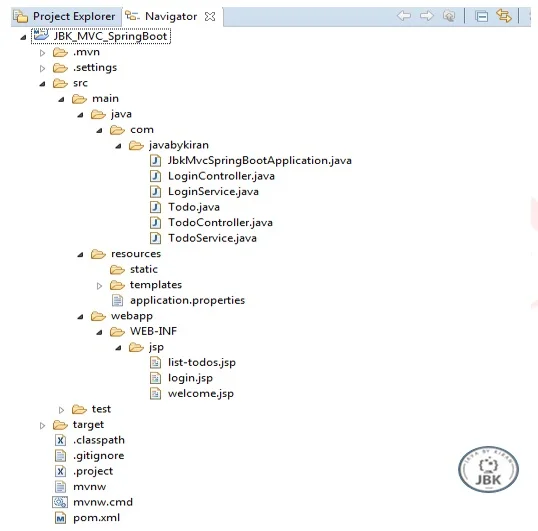
You can run this as a simple java application. You can launch the application at http://localhost:8080/login and enter userid/password combination of in jbk/jbk


