Form Data Validations
Spring has provided inbuilt validations framework. Since we are using Spring framework validation implementation, we will have to use Spring Form tags to get the errors and set the form bean and variable names. These are very simple need not to study separately.
Validations will be applied by using annotations to fields of pojo class. As a developer we need not to write logic for everything basic validations they already provided so it’s easy to use. Spring has not stopped us from writing our own validations we will see how to implement our own validations.
Firstly we need to have jars in our project to get it implemented. Your pom.xml should have following dependencies added. Spring used javax-validation and hibernate-api to achieve this.
pom.xml
<!-- Form Validation using Annotations start -->
    <dependency>
        <groupId>javax.validation</groupId>
        <artifactId>validation-api</artifactId>
        <version>1.1.0.Final</version>
    </dependency>
    <dependency>
        <groupId>org.hibernate</groupId>
        <artifactId>hibernate-validator</artifactId>
        <version> 5.2.4.Final </version>
    </dependency>
    <!-- Form Validation using Annotations end -->
Then add validation rules to User.java, I have added for String name in user class.
It provides a set of validation annotations we can use to validate the data, such as @NotNull, @Max, @Min, @Size, @Pattern, @Future & @Past.
User.java
package com.javabykiran;
import javax.validation.constraints.Pattern;
import javax.validation.constraints.Size;
import org.hibernate.validator.constraints.NotBlank;
public class User {
    // required, max & min length, alphaNumWithSpaces
    @NotBlank(message = "This is a required field")
    @Size(min = 2, max = 20, message = "name must have min length of 2, and max of 20")
    private String name;
}
Some more examples are:
// value between 50 and 300
  @Range(min=50, max=300, message="height has to be within 50 and 300")
  private Integer height;

// required, min is 15 and max is 100
  @NotNull(message="age is required")
  @Min(value=5, message="age can't be less than 5")
  @Max(value=100, message="age can't be greater than 100")
  private Integer age;

// required, date in the past not allowed
  @NotNull(message="birth date can't left blank")
  @Past
  private Date birth;
The password is required, can’t be empty, min length of 8, and must contain at least one digit, one lower char and one upper char, one special char, and doesn’t contain spaces.
// required, strong password, min length
  @NotBlank(message="password can't left blank")
  @Size(min=8, message="password can't be less than 8 chars")
  @Pattern(regexp="^(?=.*[0-9])(?=.*[a-z])(?=.*[A-Z])(?=.*[@#$%^&+=])
    (?=\\S+$).+$", message="password must contain at least one digit, one
    lower char and one upper char, one special char, and doesn't contain spaces")
  private String password;
One common question here, “What’s the difference between @NotNull, @NotEmpty, and @NotBlank ?”
@NotNull: Checks if the value is not null, disregarding the content (it can be empty). Used with dates, collections, map, array, etc.
@NotEmpty: Checks if the value is not null nor empty, allowing empty spaces but size has to be greater than zero. Used with strings, collections, map, array etc.
@NotBlank: Checks if the value is not null nor empty, and the trimmed length is greater than zero. Used with strings.
Now you need to change as below.
userForm.jsp
<%@taglib uri="http://www.springframework.org/tags/form"
    prefix="springform"%>
<springform:form action="addUser" modelAttribute="user" method="POST">
    <springform:errors path="name" cssClass="error"/>
    <br><br>
    <springform:label path="name" >Name</springform:label>
    <springform:input path="name" />
    <br><br>
    <springform:label path="id">Id</springform:label>
    <springform:input path="id" />
    <br><br>
    <input type="submit" value="Submit" />
</springform:form>
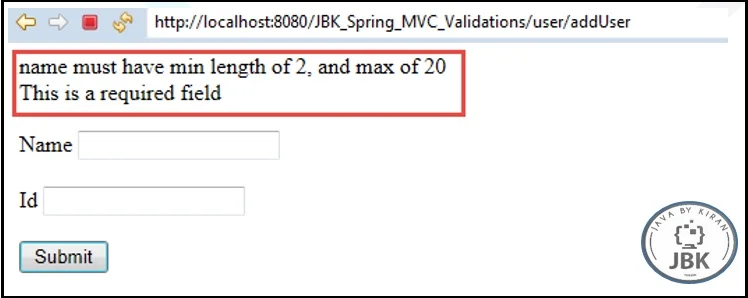
We’ll use springform:errors tag to display the validation error messages (if exist). In addition we can apply a CSS class for displaying errors.
In Controller add below code.
UserController.java
@RequestMapping(value = "/addUser", method = RequestMethod.POST)
public String addUser(@Valid User user, BindingResult results) {
    if (results.hasErrors())
        return "userForm";
    else
    return "result";
}
In above code the @Valid annotation performs validation rules on user object (we defined earlier in User class). The results of the validation will be placed in the BindingResult object.
Now run a project. You will see messages are appearing.

Now how to bring these errors from properties file. This is good for internationalization.
Add file ValidationMessages.properties – keep same name in src/main/resources
Add below lines there.
ValidationMessages.properties
NotNull=This is a required field
Length=name must have min length of 2, and max of 20
In Users.java change validation like this.
//required, max & min length, alphaNumWithSpaces
@NotBlank(message = "{ NotNull }")
@Size(min = 2, max = 20, message = "{ Length }")
private String name;
Now run a project. You will see messages are appearing from properties file.