Spring MVC Application
Now we understand the concepts, and configured our Spring MVC application.
The DispatcherServlet delegates the request to the appropriate controller to handle the request.
The @Controller annotation indicates that a particular class serves as the role of a controller.
The @RequestMapping annotation is used to map a URL to either an entire class or a particular controller method.
[a] Create controller class using @Controller annotation
The @Controller annotation inherits from @Component annotation. So, It’s a special @Component used in MVC web application, and so, it will be scanned by Spring IoC as a component.
@Controller
    @RequestMapping("/")
    public class WelcomeController {
    }
So, now, this controller will handle all the requests for root path URL of our JbkDispatcher we’ve created.
[b] Define & Map Controller Methods
We can pass different parameters like request, session, model objects, and return different types of objects (as you’ll see later) from controller method.
All request mapping on methods are relative to the controller mapping.
@Controller
@RequestMapping("/")
public class WelcomeController {
    @RequestMapping(value = "/", method = RequestMethod.GET)
    public String welcome(Model model){ /*...*/ }

    @RequestMapping(value = "/profile", method = RequestMethod.GET)
    public String profile(Model model){ /*...*/ }
}
So, now, the welcome()method will handle root path of this controller.
By default, It handles all types of HTTP request (GET, POST, etc) unless explicitly defined (i.e. using method in @RequestMapping).
[c] Adding an attribute (data) to the model
We mean by model here is an object that we can use to pass data around the controller methods and views.
These data is called model attribute(s), they can be java beans that carry form data for data binding.
So, we can pass a model attribute from a controller method to a view page, and then from the view page back to a controller method (i.e. when form is submitted).
The model object can be passed as a parameter to controller method so that we can add attributes, and these attributes can be accessed by the view to display the final result.
@Controller
    @RequestMapping("/")
    public class WelcomeController {
        @RequestMapping(value = "/", method = RequestMethod.GET)
        public String welcome(Model model){
            model.addAttribute("message", "Hello Spring MVC Framework!");
        }

        @RequestMapping(value = "/profile", method = RequestMethod.GET)
        public String profile(Model model){ /*...*/ }
    }
[d] The Controller Method Returned Value
We can return a view page name, an object, or not return anything at all. In case of returning a view page name, Spring will load the view page from using this format:prefix + view page name + suffix (defined previously in “spring-mvc-demo-servlet.xml” file) to be rendered and displayed.
package com.javabykiran;
import org.springframework.stereotype.Controller;
import org.springframework.ui.Model;
import org.springframework.web.bind.annotation.RequestMapping;
import org.springframework.web.bind.annotation.RequestMethod;
@Controller
@RequestMapping("/")
public class WelcomeController {
    @RequestMapping(value = "/", method = RequestMethod.GET)
    public String welcome(Model model) {
	model.addAttribute("message", "Hi, Spring MVC Framework!");
	return "welcome-page";
    }
}
[e] Create the view pages
These are mostly the JSP pages (but you can have HTML, PDF, Excel worksheets, XML, etc). In JSP pages, you write your HTML, and use the reusable UI components (like tags) in Spring.
In our case, we need to create “welcome-page.jsp” file.
The view pages must be located in the location we’ve defined earlier in “spring-mvc-demo-servlet.xml” file.
<html>
<head>
   <title>Spring MVC Demo</title>
 </head>
 <body>
   <h2>${message}</h2>
 </body>
</html>
The ${message} is the attribute which we assigned in welcome () method.
[f] Add tomcat server in eclipse
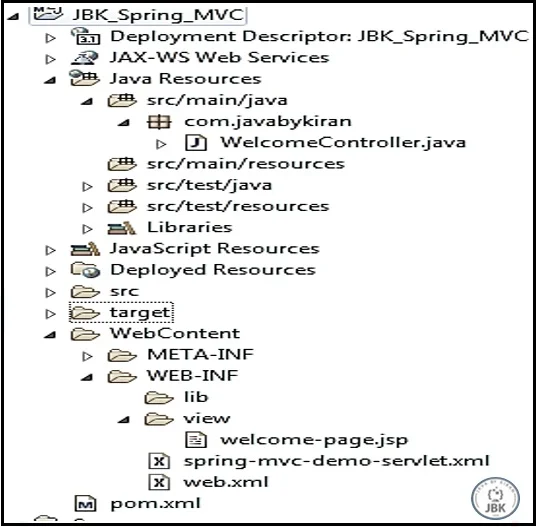
Make sure you have tomcat 8 or higher. Deploy application and run in browser. Project structure should be like this.

[g] Testing MVC Project
To test the project hit the URL → http://localhost:8080/[NameOfTheProject]/
See image below
