Html and CSS Working
Html Page Design

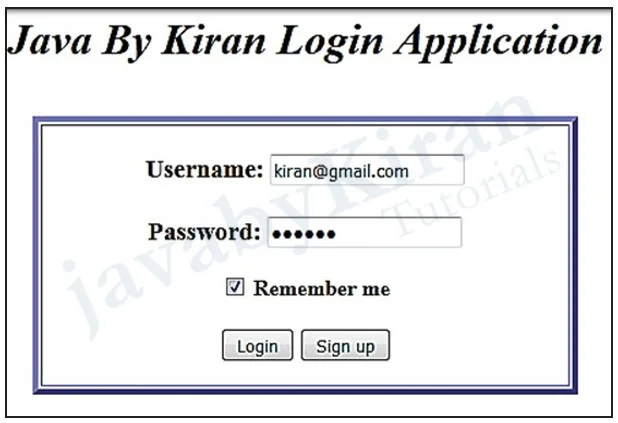
We will be writing code for below given page.
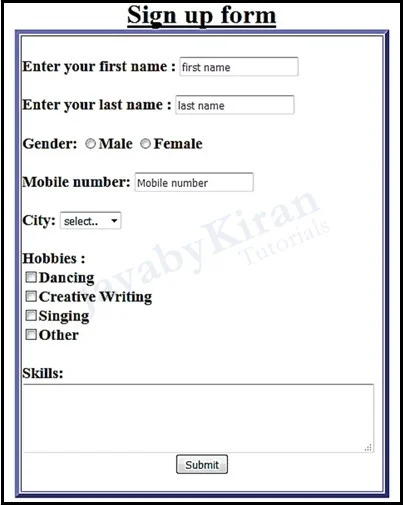
Here, after clicking on ‘login’ button ‘success page’ should appear and similarly after clicking on ‘sign up’ button ‘registration page’ should appear as shown in the above and below images.


Now write the below given code for ‘login’ and ‘sign up’ in notepad and save it as “login.html”. Then open the two files i.e. Login.html and signup.html in any browser.
<html>
<head>
<title> Java By Kiran Login </title></br></br>
<center><h1><I> Java By Kiran Login Application <I></br></br>
</head>
<body><center>
    <table border="4" bordercolor="blue" width=400><td>
    <form><center>
        <h3><b> Username:
        <input type="text" name="username"><br><br>
        <b> Password:
        <input type="password" name="password">
        </h3>
        <input type="checkbox" checked="checked"> Remember me
        <br><br>
        <input type=button onClick="location.href='success.html'" value='Login'>
        <input type=button onClick="location.href='signup.html'" value='Sign up'>
    </form>
    </td>
    </table>
</body>
</html>
Clicking on Login button will go to success.html page
    Output:
     Login Successful !!!!!!!!
Clicking on Sign up button will go to signup.html
<html>
<head>
<title>Sign up</title>
<br>
<h1><b><center><u>Sign up form
</head><br>
<body>
<center>
    <table border="5" bordercolor="blue" width=450><td>
    <form action="signupsuccess.html"><br> Enter your first name:
    <input type="text" name="firstname" placeholder="first name"><br><br>
    Enter your last name :
    <input type="text" name="lastname" placeholder="last name"><br><br>
    Gender:
    <input type="radio" name="gender" value="male" size="10">Male
    <input type="radio" name="gender" value="Female" size="10">Female<br>
    <br>
    Mobile number:
    <input type="text" placeholder="Mobile number"/><br/><br/>
    City:
    <select name="City">
    <option value="-1" selected>select</option>
    <option value="Nagpur">NAGPUR</option>
    <option value="Mumbai">MUMBAI</option>
    <option value="Pune">PUNE</option>
    <option value="Delhi">DELHI</option>
    </select><br><br>
    Hobbies : <br/>
    <input type="checkbox">Dancing<br/>
    <input type="checkbox">Creative Writing<br/>
    <input type="checkbox">Singing<br>
    <input type="checkbox">Other<br><br/> Skills:
    <br>
    <textarea rows="4" cols="50"></textarea>
    <br>
    <center><button class="title" name="signup">Submit</button>
    </form>
    </td></table>
</body>
</html>
Clicking on Submit button will go to signupsuccess.html page
    Output:
     Sign up successful.!!!
CSS
We will use css just to make our pages consistent. We can add colors, size and many more things in order to add consistency across all fields and pages. Now, create css file as shown below with the name ‘Ok.css’
body {
    background-image: url("bg6.jpg"); color:cyan;
}
div {
    margin-top: 100px;    margin-bottom: 100px;
    margin-right: 150px;  margin-left: 80px;
}
h1 {
    color: cyan;
}
Now change your login page as mentioned in the below given code.
<!DOCTYPE html>>
<html>
<head><title>Login</title>
<center>LOGIN
<link rel="stylesheet" type="text/css" href="ok.css">
</head>
<body>
    <div>
    <table border="4" bordercolor="cyan" width=400><td>
    <form>
    <h1><b>Username:</h1>
    <h2><input type="text" name="username"><br></h2>
    <h1><b>Password:</h1>
    <h2><input type="password" name="password"><br></h2>
    <input type="checkbox" checked="checked"> Remember me
    <br><br>
    <p><input type=button onClick="location.href='loginsuccesscss2. html'" value='Login' style="width: 100px; height: 40px;">
    <input type=button onClick="location.href='signupcss2.html'" value='Sign up' style="width: 100px; height: 40px;">
    </p>
     </form>
     </td></table>
     </div>
 </body>
 </html>
Here in this program div and background images will appear.