Reports generation in TestNG
The test report is the most important feature of the Selenium framework.
Different types of report generation:
Default report of testNG
-We already checked this before and it exists in test-output folder.Extent Report
XSLT Report
Extent Report
Pre-requisites to Generate Extent Reports:
Java should be installed (Link to Install and setup Java)
TestNG should be installed (Not Mandatory)
Extent Report Jars (Version 2.41.2) should be installed –
Open link http://www.javabykiran.com/selenium/downloads/extentreports/extent-config.xml – It allows us to configure HTML Report. (Not Mandatory)
Open link http://www.javabykiran.com/selenium/downloads/extentreports/
Steps To Generate Extent Reports:
First create a TestNG project in eclipse
Now download extent library files from the following link: http://www.javabykiran.com/selenium/downloads/extentreports/
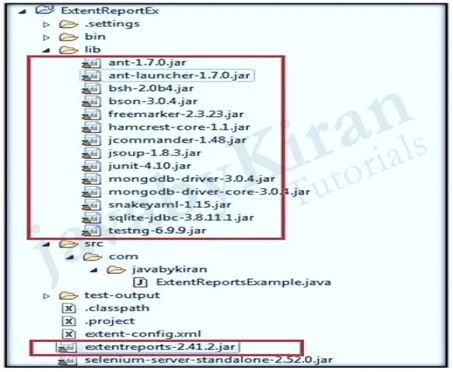
Add the downloaded library files in your project
Create a java class say ‘ExtentReportsExample’ and add following code in it
ExtentReportsExample.java
package com.javabykiran;
import java.io.File;
import org.testng.Assert;
import org.testng.ITestResult;
import org.testng.SkipException;
import org.testng.annotations.AfterMethod;
import org.testng.annotations.AfterTest;
import org.testng.annotations.BeforeTest;
import org.testng.annotations.Test;
import com.relevantcodes.extentreports.ExtentReports;
import com.relevantcodes.extentreports.ExtentTest;
import com.relevantcodes.extentreports.LogStatus;
public class ExtentReportsExample {
    ExtentReports extent;
    ExtentTest logger;
    @BeforeTest
    public void startReport() {
        extent = new ExtentReports(System.getProperty(“user.dir”) + “/test-output/STMExtentReport.html”,true);
        extent.addSystemInfo(“Host Name”, “javabykiran”).addSystemInfo(“Environment”, “Automation Testing”).addSystemInfo(“User Name”, “KiranSeleneium”);
        // loading the external xml file (i.e., extent-config.xml) which was
        // placed under the base directory
        // You could find the xml file below. Create xml file in
        //your project
        // and copy past the code mentioned below extent.loadConfig(new File(System.getProperty(“user. dir”) + “\\extent-config.xml”));
    }
    @Test
    public void passTest() {
        // extent.startTest(“TestCaseName”, “Description”)
        // TestCaseName – Name of the test
        // Description – Description of the test
        // Starting test
        logger = extent.startTest(“passTest”);
        Assert.assertTrue(true);
        // To generate the log when the test case is passed
        logger.log(LogStatus.PASS, “Test Case Passed is passTest”);
    }
    @Test
    public void failTest() {
        logger = extent.startTest(“failTest”);
        Assert.assertTrue(false);
        logger.log(LogStatus.PASS, “Test Case(failTest)- is passed”);
    }
    @Test
    public void skipTest() {
        logger = extent.startTest(“skipTest”);
        throw new SkipException(“Skipping - Not ready for test”);
    }
    @AfterMethod
    public void getResult(ITestResult result) {
        if (result.getStatus() == ITestResult.FAILURE) {
            logger.log(LogStatus.FAIL, “Test Case Failed is “ + result. getName());
            logger.log(LogStatus.FAIL, “Test Case Failed is “ +	result.getThrowable());
        }
        else if (result.getStatus() == ITestResult.SKIP){
            logger.log(LogStatus.SKIP, “Test Case Skipped is “ + result.getName());
        }
        // end test
        // endTest(logger) : It ends the current test and prepares to create
        // HTML reportextent.endTest(logger);
        }
    @AfterTest
    public void endReport() {
        // writing everything to document
        // flush() - to write or update test information to your report.
        extent.flush();
        extent.close();
    }
}
extent-config.xml:
By using this external XML file (extent-config.xml), we could change the details such as Report Theme (either standard or dark), Report Title, Document Title etc.,
We use extent object and use loadConfig () method to load this xml file.
<extentreports>
<configuration>
<!-- report theme --> <!-- standard, dark -->
<theme>standard</theme>

<!-- document encoding --> <!-- defaults to UTF-8 -->
<encoding>UTF8</encoding>

<!-- protocol for script and stylesheets --> <!-- defaults to https -->
<protocol>https</protocol>

<!-- title of the document -->
<documentTitle>ExtentReports 2.0</documentTitle>

<!-- report name - displayed at top-nav -->
<reportName></reportName>

<!-- report headline - displayed at top-nav, after reportHead- line -->
<reportHeadline>Automation Report</reportHeadline>

<!-- global date format override --> <!-- defaults to yyyy-MM-dd-->
<dateFormat>yyyy-MM-dd</dateFormat>

<!-- global time format override -->
<!-- defaults to HH:mm:ss -->
<timeFormat>HH:mm:ss</timeFormat>

<!-- custom javascript -->
<scripts>
    <![CDATA[ $(document).ready(function() {});]]>
</scripts>

<!-- custom styles -->
<styles>
    <![CDATA[]]>
</styles>
</configuration>
</extentreports>
Now run this above program but before running we need to check directory structure. All jars must be in build path.
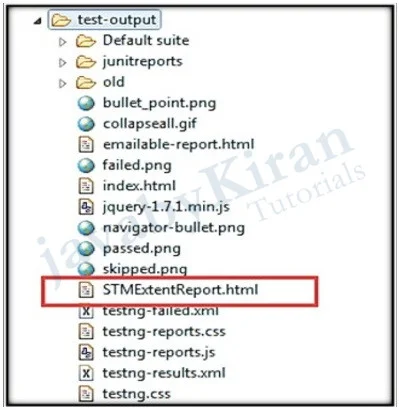
Now refresh project and go to “test-output” folder. You will see the screen as shown in the below file.
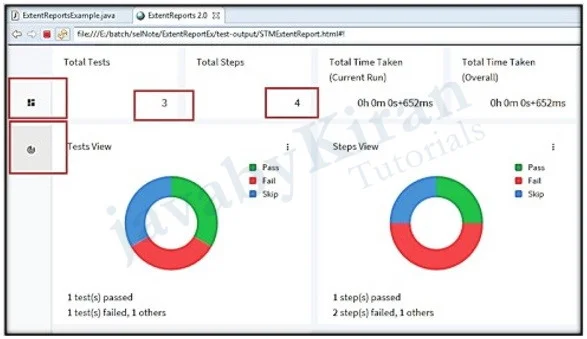
Open report and it will show the below screen.
XSLT Report
In Selenium, TestNG provides its default reporting system. To enhance the reporting feature further XSLT Report proves helpful. It also has more user-friendly UI and detail description for the test suite result.
What is XSLT?
XSLT stands for “Extensible Stylesheet Language Transformations”. XSLT is a language for transforming XML documents into other XML documents (XHTML) that are used by a browser.
With XSLT, we can customize the output file by adding/removing attributes and elements in the XML file. This helps us to interpret the result quickly. All browsers support XSLT. It uses XPath to navigate through elements and attributes in XML documents.
Below are the most popularly used XSL element in programming:
- < xsl:stylesheet>: It defines that the document is an XSLT style sheet document.
- < xsl:if>: It is used to put a conditional test against the content of the XML file.
- < xsl:template>: It is used to build templates.
- < xsl:apply-templates>: It is used to apply templates to elements.
- < xsl:choose>: It is used in conjunction with < xsl: otherwise> and < xsl:when> to express multiple conditions.
- < xsl:for-each>: It is used to select every XML element of a specified node.
- < xsl:value-of>: It is used to extract the value of a selected node.
- < xsl:sort>: It is used to sort the output.
Pre-requisite to generate XSLT report. Following is the pre-requisite to generate XSLT report:
ANT build tool should be installed (Its necessary to install ANT for XSLT reporting feature). ANT is used to compile the source code and create the build. It is also very much extensible.
XSLT package downloaded.
Selenium script should be executed by TestNG.
ANT
What is Ant?
Apache Ant is a Java based build tool from Apache.
Apache Ant’s build files are written in XML.
Open Source tool.
Steps To Install ANT-
Step 1- Download ant zip file.
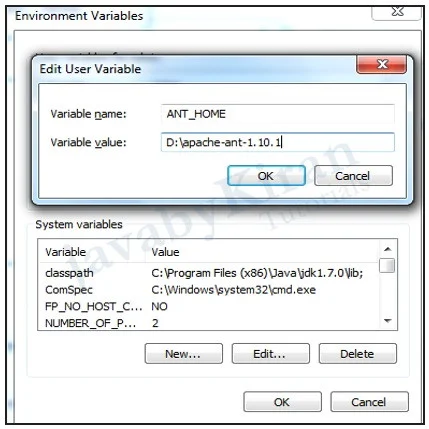
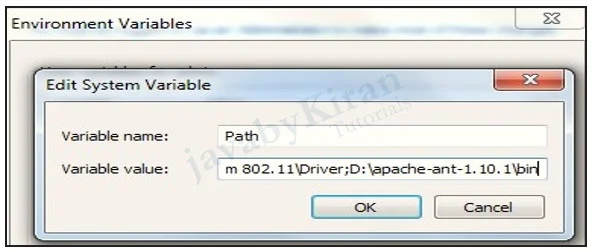
Step 2- Extract Zip file and then we need to set environment variable by following below steps.
Step 3- Right click on My computer and select the properties and click on Advanced system setting.
C:\Users\admin>D:
D:\>ant
Unable to locate tools.jar. Expected to find it in C:\Program Files (x86)\Java\j
re1.8.0_45\lib\tools.jar
Buildfile: D:\build.xml
help:
[echo]
[echo]	This is POI 3.13
[echo]	Java Version 1.8
[echo]	Timestamp 20180111
[echo]	The main targets of interest are:
[echo]	- clean Erase all build work products (ie.
        everything in the build directory)
[echo]	- compile Compile all files from main, ooxml
        and scratchpad
[echo]	- test Run all unit tests from main, ooxml and
        scratchpad
[echo]	- jar Produce jar files
[echo]	- jar-src Produce source-jar files
[echo]	- assemble Produce the zipped distribution files
[echo]	- site Generate all documentation (Requires Apache Forrest)
[echo]	- dist Create a distribution (Requires Apache Forrest)
[echo]
BUILD SUCCESSFUL
Total time: 1 second
Generate XSLT Report
Scenario: We will automate and generate XSLT report for the below scenario:
Step 1- Create 2 Test case as below:
package com.javabykiran;
import org.testng.Assert;
import org.testng.annotations.Test;
public class XSLTTest {
    @Test(priority = 1)
    public void VerifyTestPass() {
        Assert.assertEquals(“True”, “True”);
    }
    @Test(priority = 2)
    public void VerifyTestFail() {
        Assert.assertEquals(“True”, “False”);
    }
}

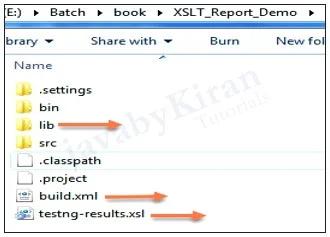
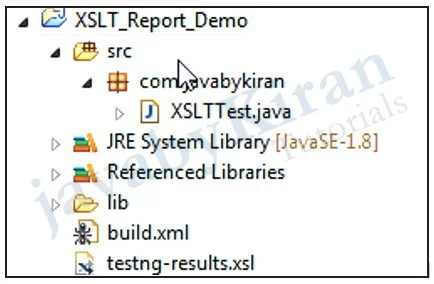
Now Run first your testcases with TestNG and then Run this build.xml file
Right click on build.xml and Run as Ant build
Then a new window opens. Now select option ‘generateReport’.
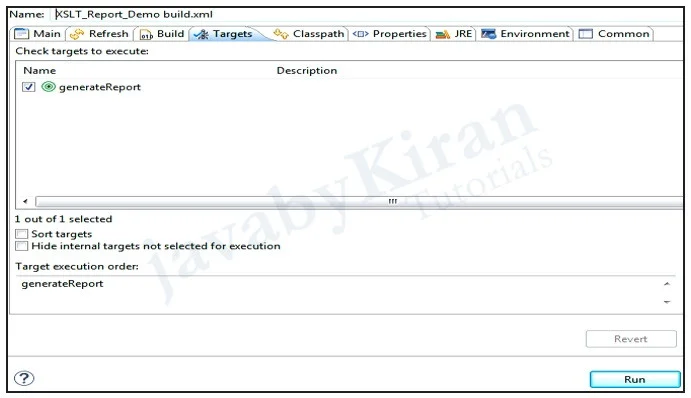
Click on Run button. It should generate the report.
Verifying XSLT Report
Once build is successful and moved to project home directory. We will find the testng-xslt folder.
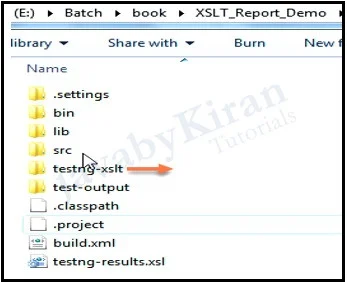
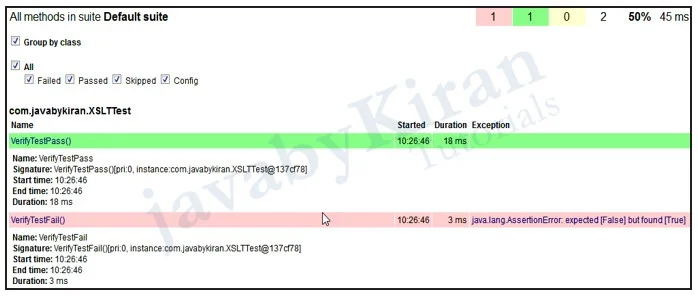
Open the folder and check Index.html file. You will see below report:

