TestNG working in Selenium
Why TestNG?
Selenium is used for automation of a website and not for writing test cases.
TestNG is for writing test cases and getting reports.
We can integrate testNG with various other in built frameworks like Maven, Jenkins Etc.
To make testNG working in eclipse we need to first add the plugin into eclipse. Below are steps for the same.
Go to Help >> Eclipse Marketplace >> In search bar type testNG

Now, once you are done with the installation of plugin, you can now create testNG classes. Till now the examples were run through main method but in testNG that care has been taken by testNG framework.
Creating TestNG Classes
Now we will perform a simple program for testNG without using selenium.
Firstly we will create one testNG class to observe the flow of built-in methods of testNG.
Create a Java project with any name.
Create a package with name “com.javabykiran” and then right click on Source >> New >> Package >> com.javabykiran
Now right click on Package javabykiran and then go to New >> Other >> testNG class.
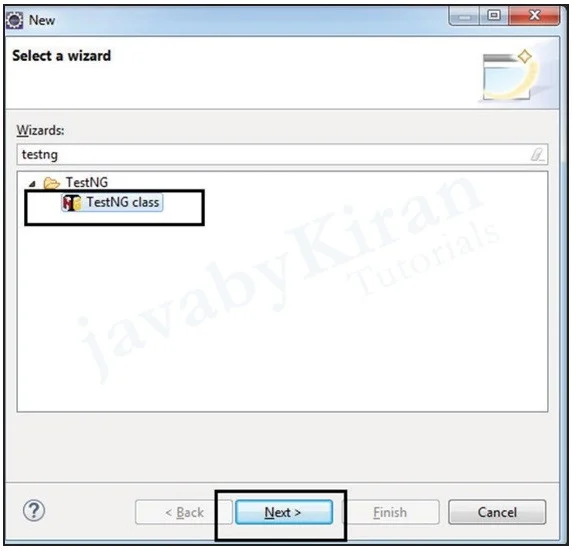
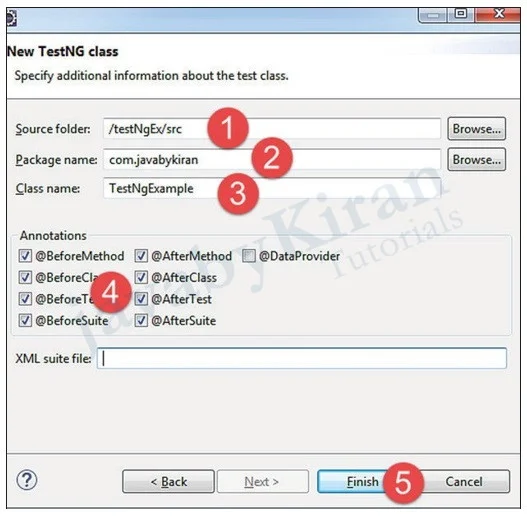
After clicking on finish, we will get one class which is automatically created by built-in testNG methods.
Write simple printing statements just for understanding lifecycle of methods.
We will come across many compile time errors and so first we need to resolve them.
The main reason behind this error is that we have not added a jar for testNG, which includes many classes of testNG.
Hover mouse on errors and add library which comes built-in in eclipse as we have already added plugin.
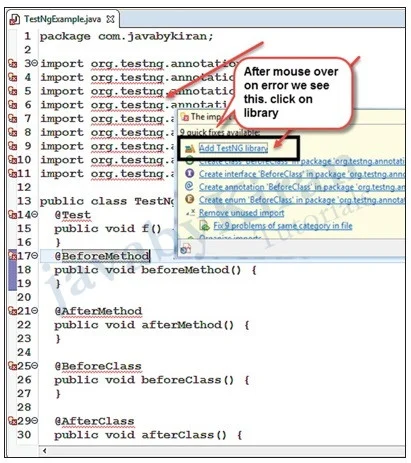
After adding library, it will no more show the errors. Now we just need to add some printing statements in every method as shown below.
If required, change method names but make sure you do not make changes in annotation names as they are predefined by testNG and come from jar files which we added.
Annotations in TestNG
“@Test” annotation is used for writing test cases. So we will make two test cases in this example, so that we will get to know the proper lifecycle related to testNG.
Now run this class by right clicking class and click on run as >> testNG class.
package com.javabykiran;
import org.testng.annotations.Test;
import org.testng.annotations.BeforeMethod;
import org.testng.annotations.AfterMethod;
import org.testng.annotations.BeforeClass;
import org.testng.annotations.AfterClass;
import org.testng.annotations.BeforeTest;
import org.testng.annotations.AfterTest;
import org.testng.annotations.BeforeSuite;
import org.testng.annotations.AfterSuite;
public class TestNgExample {
    @Test
    public void arithmaticTest_1() {
        System.out.println("arithmaticTest_1 test case");
    }

    @Test
    public void arithmaticTest_2() {
        System.out.println("arithmaticTest_2 test case");
    }

    @BeforeMethod
    public void beforeMethod() {
        System.out.println("beforeMethod");
    }

    @AfterMethod
    public void afterMethod() {
        System.out.println("afterMethod");
    }

    @BeforeClass
    public void beforeClass() {
        System.out.println("beforeClass");
    }

    @AfterClass
    public void afterClass() {
        System.out.println("afterClass");
    }

    @BeforeTest
    public void beforeTest() {
        System.out.println("beforeTest");
    }

    @AfterTest
    public void afterTest() {
        System.out.println("afterTest");
    }

    @BeforeSuite
    public void beforeSuite() {
        System.out.println("beforeSuite");
    }

    @AfterSuite
    public void afterSuite() {
        System.out.println("afterSuite");
    }
}

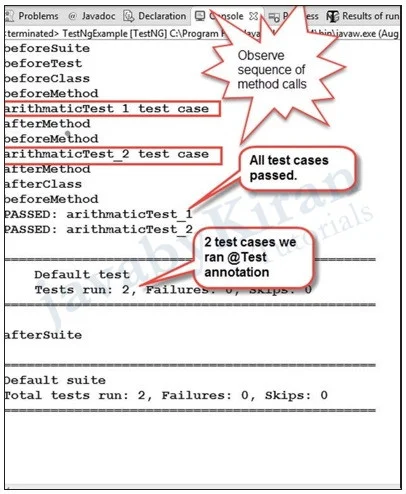
Now here we need to see how our methods get called and what the sequence of these methods is. Observe before and after test cases, which methods are called and how many methods are called only once during complete execution like ‘beforeSuite’ and ‘afterSuite’.
Every method has its own significance like sometimes we don’t wish to open the browser repeatedly for every test case and so we will write the ‘opening of browser’ code only once in ‘beforesuite’ method and ‘closing of browser’ in ‘afterSuite’ method.
Let’s say we want to perform some common prerequisite for every test case. We will write that code in ‘@beforeMethod’ method so that we need not write the code repeatedly in every test case as this ‘@beforeMethod’ gets called before every test case.
Below are some of the generally used text in testNG.
We use ‘suite’ for the whole application or project. We can have many ‘suits’.
We use ‘Test’ for modules in the projec.t
‘Class’ can be used for every page or functionality of any modules.
‘Method’ is for test cases inside a class.
So we can now say that ‘suite has test’, ‘test have classes’ and ‘classes can have test cases’. Similarly, ‘project has modules’, ‘modules have functionalities’ and ‘every functionality has some test cases’.
Meaning of all Annotations
@BeforeSuite: The annotated method will be run before all tests in this suite have run.
@AfterSuite: The annotated method will be run after all tests in this suite have run.
@BeforeTest: The annotated method will be run before any test method belonging to the classes inside the < test> tag is run.
@AfterTest: The annotated method will be run after all the test methods belonging to the classes inside the < test> tag have run.
@BeforeGroups: The list of groups that this configuration method will run before. This method is guaranteed to run shortly before the first test method that belongs to any of these groups is invoked.
@AfterGroups: The list of groups that this configuration method will run after. This method is guaranteed to run shortly after the last test method that belongs to any of these groups is invoked.
@BeforeClass: The annotated method will be run before the first test method in the current class is invoked.
@AfterClass: The annotated method will be run after all the test methods in the current class have been run.
@BeforeMethod: The annotated method will be run before each test method.
@AfterMethod: The annotated method will be run after each test method.
@AfterSuite: The annotated method will be run after all tests in this suite have run.
Writing test cases in testNG without using Selenium
In this example we use the assertEquals method of Assert class which requires expected and actual result.
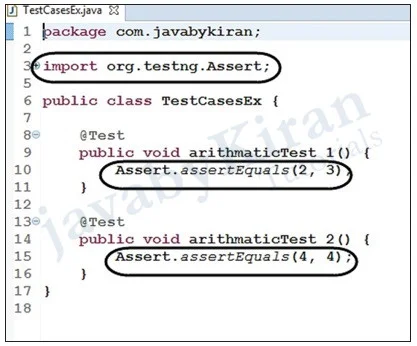
Run these 2 test cases we will see one will be passed and other will be failed. See results in console.

We will see now report generated for these test cases.
Reports
Refresh project by pressing F5 on your current testNG project in navigator. There will be one folder automatically created test-output.
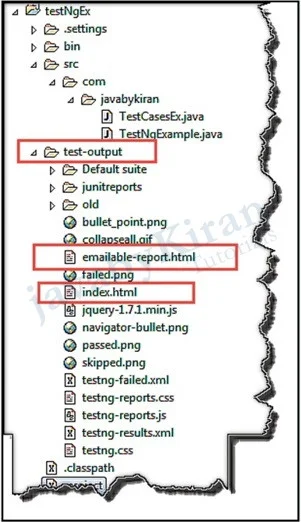
Open these highlighted html pages in browser right click on page >> open with >> web browser.
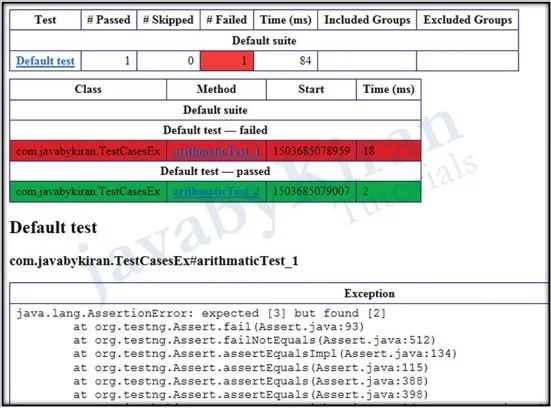
You will see a graphical representation of test cases and results.
Click on the hyperlinks in the report and explore more here.
Now we will focus on one test case in depth. Modify your classes as below. Keep only one test case, but write more assert cases as we can have many check points in one test case.
Let’s say we have a login test case, then we may need to check user name and password error messages if we put invalid in the login details in a web page. In this case we need to use 2 assertequals methods in one test case.
We need to know, how it works if we use many asserts in one test case.
Note that we are learning hard assert right now. Soft assert will be explained later.
package com.javabykiran;
import org.testng.Assert;
import org.testng.annotations.Test;
public class TestCasesEx {
    @Test
    public void arithmaticTest_1() {
        System.out.println(1);
        Assert.assertEquals(3, 3);
        System.out.println(2);
        Assert.assertEquals(4, 4);
        System.out.println(3);
        Assert.assertEquals(2, 3);
        System.out.println(4);
        Assert.assertEquals(3, 5);
        System.out.println(5);
        Assert.assertEquals(5, 5);
        System.out.println(6);
    }
}
    Output:
     1
     2
     3
     FAILED: arithmaticTest_1
     java.lang.AssertionError: expected [3] but found [2]
          at org.testng.Assert.fail(Assert.java:93)
On output we can see 1 2 3 printed, but as soon as our test cases failed our test case will be terminated its execution.
So we will not get complete expected result that’s why we need to go for soft assert.
Note: Let’s say we have 2 test cases means two methods, then other test cases will not have impact due to one test case failure but another test case will continue.
Now Before going into more assertion let’s explore Assert class of testNG.