Selenium Grid Working
Selenium Grid Architecture
Selenium Grid has a Hub and a Node
Hub:
The hub can also be understood as a server which acts as the central point where the tests would be triggered. A Selenium Grid has only one Hub and it is launched on a single machine once.
The hub is the central point where we load our tests into.
There should only be one hub in a grid.
The hub is launched only on a single machine, say, a computer whose OS is Windows 7 and whose browser is IE.
The machine containing the hub is where the tests will be run, but we will see the browser being automated on the node.
Nodes:
Nodes are the Selenium instances that are attached to the Hub which executes the tests. There can be one or more nodes in a grid, which can be of any OS and can contain any of the Selenium supported browsers.
Nodes are the Selenium instances which will execute the tests that we loaded on the hub.
There can be more than one node in a grid.
Nodes can be launched on multiple machines with different platforms and browsers.
The machines running the nodes need not be on the same platform as that of the hub.
Configuring Hub
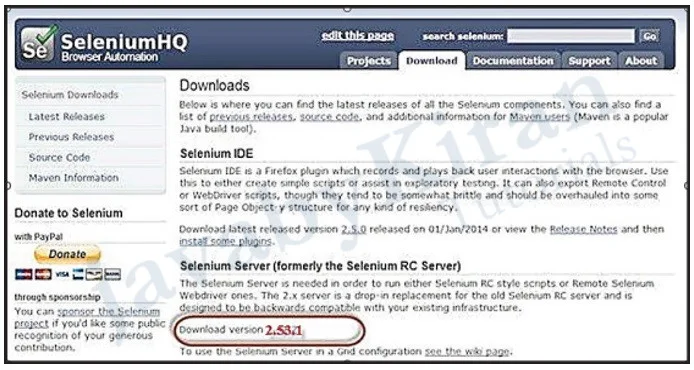
Step 1: Download the latest Selenium Server standalone JAR file from http://docs.seleniumhq. org/download/. Download it by clicking on the “Download version” as shown in the below image:
Step 2: Start the Hub by launching the Selenium Server using the command given below. Now we will use the port ‘4444’to start the hub.
Note: Ensure that Internet Connection is on and there are no other applications that are running on port #4444.
Command: (Note: Highlighted part in the given below command should be the location of selenium jar on your machine/computer)
java -jar d:\selelib\selenium-server-standalone-2.52.0.jar-port4444-role hub -nodeTimeout 1000
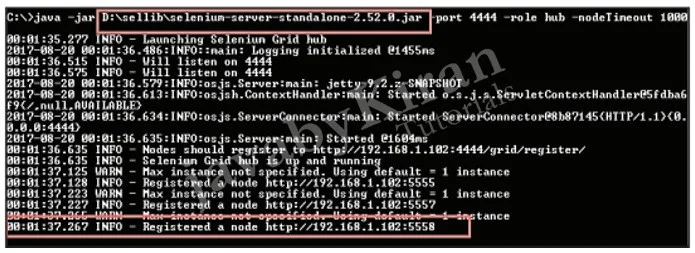
Now we will see in the above image that hub has been registered.
Step 3: Now open the browser and navigate to the URL http://localhost:4444 from the Hub (The system where you have executed Step#2).

Step 4: Now click on the ‘console’ link as shown in above image and click ‘view config’. The config of the hub would be displayed. As of now, we haven’t got any nodes, hence we will not be able to see the details.
Configuring Nodes
Open new command prompt.
Step 1: Logon to the node (Machine / computer where you would like to execute the scripts. For practice purpose, you can use the same machine where we have configured Hub).
Step 2: Launch Firefox Node using the below given command. (Note: Highlighted part in the given below command should be the location of selenium jar on your machine/computer)
java -jar D:\sellib\selenium-server-standalone-2.52.0.jar -role node -hub http://localhost:4444/grid/register-browser browserName=firefox -port 5555
Where,
- D:\sellib\selenium-server-standalone-2.52.0.jar = Location of the Selenium Server Stand Alone Jar File(on the Node Machine).
- http://localhost:4444 = IPAddress of the Hub and 4444 is the port of the Hub
- browserName = firefox (Parameter to specify the Browser name on Nodes)
- 5555 = Port on which Firefox Node would be up and will run on.
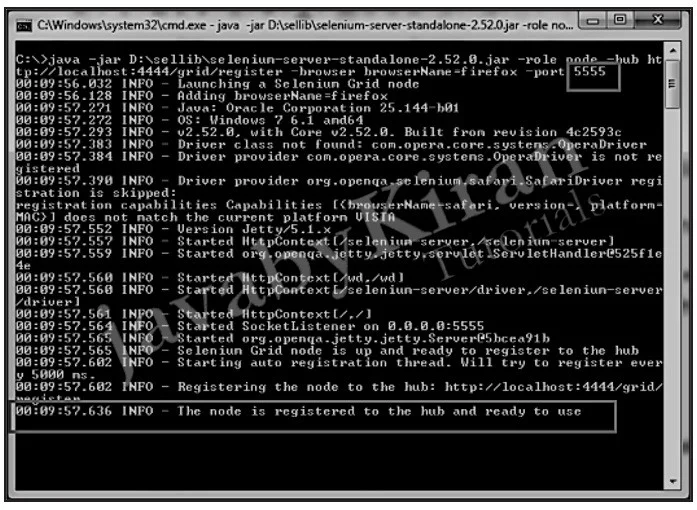
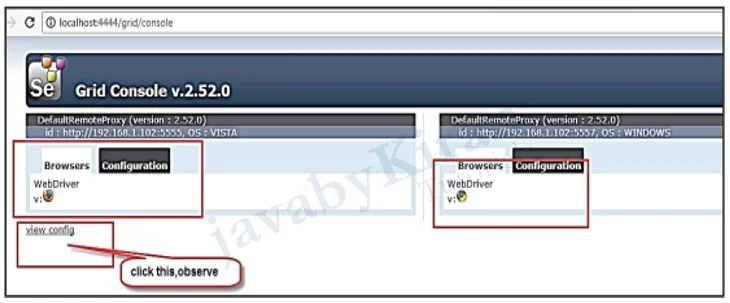
Step 3: After executing the command, go back to the Hub. Navigate to the URL http://localhost:4444 and the Hub will display the node attached to it.
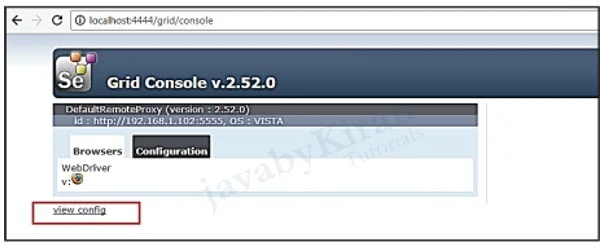
Step 4: Let us now launch Chrome Node for which; we need to have the Chrome driver downloaded to the node machine.
Step 5: To download the Chrome Driver, navigate to http://docs.seleniumhq.org/download/ and then navigate to Third Party Browser and then in the Drivers area click on the version number ‘2.16’ as shown in the below image:

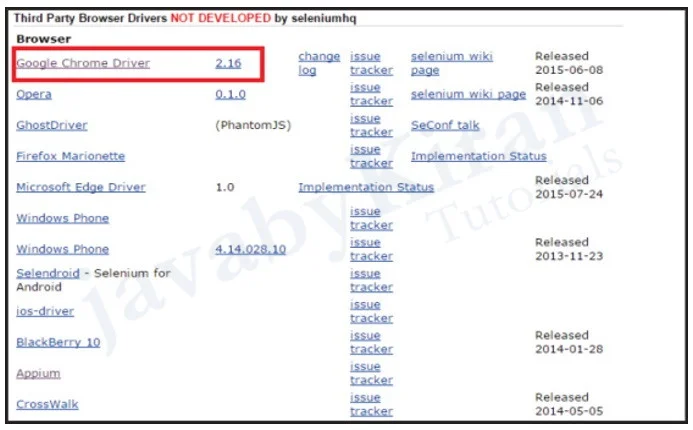
Step 6: Download the driver based on the type of your OS. We will execute it on Windows environment, hence we will download the Windows Chrome Driver. After you have downloaded, unzip the .exe file and place it in a folder which has to be referred while launching chrome nodes.
Step 7: Launch Chrome using the following command.
Open new command prompt. (Highlighted below is location of chrome driver which we downloaded in the above step and selenium jar file respectively.)
Command: C:\>java -Dwebdriver.chrome.driver=D:\sellib\chromedriver.exe -jar D:\ sellib\seleniumD server-standalone-2.52.0.jar -role webdriver -hub http://localhost:4444/grid/register -browser browserName=chrome, platform=WINDOWS -port 5557
Where,
- D:\sellib\chromedriver.exe = The location of the downloaded chrome Driver on the Node Machine.
- D:\sellib\selenium-server-standalone-2.52.0.jar = Location of the Selenium Server Stand Alone Jar File on the Node Machine.
- http://localhost:4444 = IPAddress of the Hub where 4444 isthe port of the Hub.
- browserName = chrome (Parameter to specify the Browser name on Nodes).
- 5557 = Port on which chrome Node would be up and running.
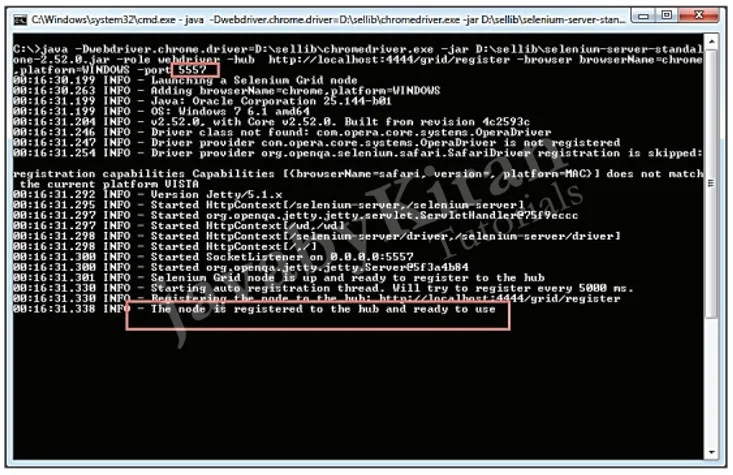
Step 8: After executing the command, go back to the Hub and navigate to the URL http://localhost:4444 and the Hub will display the chrome node attached to it.
Develop the Script and Prepare the XML File
We will develop atest using TestNG. In the following example, we will launch each one of those browsersusing remote WebDriver. It will pass on their capabilities to the driver so that the driver has all information to execute on Nodes.
The Browser Parameters would be passed from the “XML” file.
Write the below given code.
package com.javabykiran.grid;
import java.net.MalformedURLException;
import java.net.URL;
import java.util.concurrent.TimeUnit;
import org.openqa.selenium.By;
import org.openqa.selenium.WebDriver;
import org.openqa.selenium.WebElement;
import org.openqa.selenium.remote.DesiredCapabilities;
import org.openqa.selenium.remote.RemoteWebDriver;
import org.testng.Assert;
import org.testng.annotations.AfterTest;
import org.testng.annotations.BeforeTest;
import org.testng.annotations.Parameters;
import org.testng.annotations.Test;
public class TestNGGrid {
    public WebDriver driver;
    public String URL, Node;
    @Parameters("browser")
    @BeforeTest
    public void launchapp(String browser) throws MalformedURLException {
    String URL = "http://www.javabykiran.com/selenium/demo";
    if (browser.equalsIgnoreCase("firefox")) {
        System.out.println(" Executing on FireFox");
        String Node = "http://localhost:5555/wd/hub";
        DesiredCapabilities cap = DesiredCapabilities.firefox();
        cap.setBrowserName("firefox");
        driver = new RemoteWebDriver(new URL(Node), cap);
        // Puts an Implicit wait, Will wait for 10 seconds before throwing
        // exception
        driver.manage().timeouts().implicitlyWait(10, TimeUnit.SECONDS);

        // Launch web
        site driver.navigate().to(URL); driver.manage().window().maximize();
    } else if (browser.equalsIgnoreCase("chrome")) {
        try {
        System.out.println(" Executing on CHROME"); DesiredCapabilities cap = DesiredCapabilities.chrome(); cap.setBrowserName("chrome");
        String Node = "http://localhost:5557/wd/hub"; driver = new RemoteWebDriver(new URL(Node), cap);
        driver.manage().timeouts().implicitlyWait(10, TimeUnit.
        SECONDS);

        // Launch website driver.navigate().to(URL); driver.manage().window().maximize();
        } catch (Exception e) {
            e.printStackTrace();
        }
    } else {
        throw new IllegalArgumentException("The Browser Type is Undefined");
        }
    }
    @Test
    public void testUnameBlankMessage() {
        // Maximize window
        driver.manage().window().maximize();
        // locate email element
        WebElement userEle = driver.findElement(By.id("email"));
        // enter uname into text box
        userEle.sendKeys(" ");
        // locate password element
        WebElement passwordEle = driver.findElement(By.id("password"));
        // enter password into text box passwordEle.sendKeys(" ");
        // locate signin button
        WebElement signInbuttonEle = driver.findElement(By.xpath(".//*[@ id='form']/div[3]/div/button"));
        // click signin button signInbuttonEle.click();
        String unameErrorMessage = driver.findElement(By.id("email_error")).getText();
        Assert.assertEquals("Please enter email.", unameErrorMessage);
    }
    @AfterTest
    public void closeBrowser() {
        driver.quit();
    }
}
Write xml code as shown below with the name ‘testng.xml’.
<?xml version=”1.0” encoding=”UTF-8”?>
<!DOCTYPE suite SYSTEM “http://testng.org/testng-1.0.dtd”>
<suite name=”Suite” parallel=”tests”>
    <test name=”FirefoxTest”>
        <parameter name=”browser” value=”firefox”/>
        <classes>
            <class name=”com.javabykiran.grid.TestNGGrid”/>
        </classes>
    </test>
    <test name=”ChromeTest”>
        <parameter name=”browser” value=”chrome” />
        <classes>
            <class name=”com.javabykiran.grid.TestNGGrid”/>
        </classes>
    </test>
</suite>
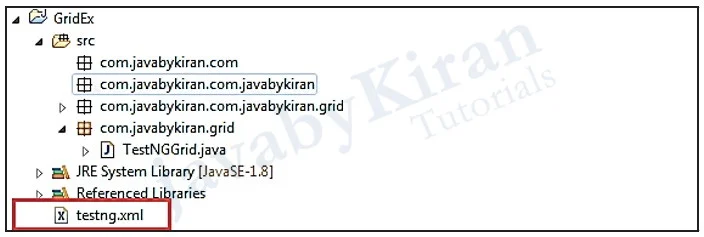
Now run a suite.
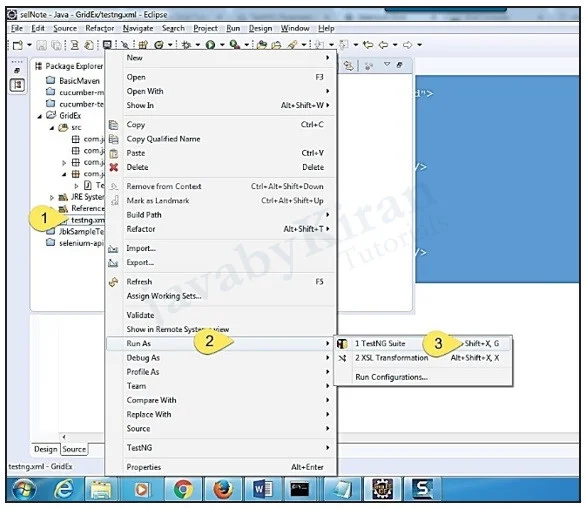
We will see 2 browsers opening at a time and the below shown text will be seen in the command prompt.
    [TestNG] Running:
    \batch\selNote\GridEx\testng.xml
    Executing on FireFox
    Executing on CHROME
    ==============================================================
    Suite
    Total tests run: 2, Failures: 2, Skips: 0
    ===============================================================
Benefits of Selenium Grid
Instead of the browser poping up on one’s box every time while executing, delegate it to a set of machines and they will run and return back the results to us.
Be able to test on different browsers, versions and platforms (Windows and Unix).
The use case for Big Data, cheap hardware machines [old machines like those 1gig, centrino boxes for eg.] can be spun together into a selenium GRID. This works because all weneed isa browser to work on the machine as we are not interested in the whole performance of the OS.
Manage the browser infrastructure in a much flexible and efficient way when updates for browsers [or new browsers] arrives in the market.
Since you have followed JSON over write protocol also known as Webdriver protocol, expanding to use mobile automation tools like Appium will feel like a breeze.